Friday, January 31, 2014

TAG Think

Once you’ve been using TAGteach long enough, it starts invading your thoughts!


First, it starts creeping into how you interpret other’s teaching. In a riding lesson the other day, I was on a horse I’d never ridden before, so I fell into old nervous habits like lowering my hands to be ready to grab his mane. After being reminded a few times to keep the reins shorter, I found myself thinking, “Ok, tag point is: Shoulders back.” This brought my hands and elbows off of the horse’s neck and up where they should be without having to keep shortening the reins over and over again.


After it’s entrenched in your interpretations of others’ directions, it starts sliding into your own problems. As I was doing a conditioning session with some friends, I found I was “cheating” too much when doing assisted pistols. I thought, “how can I fix this and get better form? Tag point is: weight in heels.” It worked! I was able to push correctly with my legs and not use weird form to make the exercise easier.


Tag-think is pretty amazing - it can simplify things when you’re struggling to fix a position or understand what someone is telling you to do. Here’s some ways to integrate Tag-Think into your life!


1. Syphon other’s instructions into tag points.
Some really good teachers can use TAGteach and not realize it - narrowing their lessons into a focus point or explaining things and then cutting it down to useful bits that very much mirror tag points. Others, well, not so much. They’ll explain things until your eyes glaze over and you forget what you were supposed to learn. This method can work with both!


When a teacher explains something, think about a few things:
  • what they want you to do
  • how they’re suggesting you go about it
  • what is one specific thing you can focus on to accomplish that, or at least closer to accomplishing that? (tag points!)


Not everything can be fixed with one tag point. Each step or movement probably can be broken down into several. It can take time to learn the tag points that will work magically fix everything, but if you’re always thinking in tag, it gets easier.


2. Use Tag on yourself.
Make sure you’re using good teaching principles for yourself, too! When you’re trying to, say, fix your own form doing a difficult squat variation, don’t think: well, I have to use this muscle and that one and not twist around and lose my balance or throw my arms around to get up more easily…. I’m doing it wrong! Try to think: I want to do this squat correctly. I tend to lean forward and lose balance, how can I correct that? What tag point do I need? If your tag point doesn’t work, don’t despair! Think of a different one! If you can’t figure out a Tag Point just on your own, try watching someone else doing what you’re trying to do, and look for the key movements. You can also phone-a-friend and ask someone to watch you do it and give you a Tag Point!


3. Use the Focus Funnel
You want to teach something complicated, but your audience is not familiar with tagging, or you just don’t have a clicker. No biggie! Use the focus funnel: lesson, instructions, tag points. Start out by explaining the whole idea behind what you’re doing; this is the lesson. Then the instructions, where you explain what you want your learner to do. Finally, the “tag points,” exactly what you want your learner to do, in 5 words or less. This is essentially tag, but you don’t need to use tag language or a clicker to get your lesson across effectively. Also, you don’t need to get all the way down to tag points when explaining something that isn’t ending with giving clear, precise instructions. Just keeping the focus funnel in mind while discussing most anything can help you get to the important bits and keep from bogging them down with too much information.

Using these, you can hopefully make any interactions with others more rewarding for yourself and the other person using the power of positive reinforcement! Or, well, maybe just less frustrating. Either way, integrating TAGteach into the way you think can have a great effect on how you teach and how you learn. Good luck out there!

Here's an awesome (but LONG) video of TAG in action:


Thursday, January 23, 2014

6 Exercises For Both You and Your Dog!

Here in the midwest, winter can be a hard time for both humans and dogs to get the exercise they need. We have previously posted about exercises you can do to improve your dog’s fitness, but now we are taking it one step further. Here are six (ok, 12) exercises that are useful for both humans AND dogs. Keep both you and your dog in shape this winter so you can safely hit the woods running as SOON as the nice weather returns!


Squats:


Squats are great!  Remember good squat form for people is to have your knees directly above your toes (and not going in front of them!), back straight and tall, and to be sure you move through the FULL range of motion - at least down until your thigh is parallel with the ground and back up to vertical!


For the dog, teach him to put his front feet on a short object. Ask for a sit and reinforce for keeping the feet on that object.  Ask or lure him into a stand, once again reinforcing for keeping front feet on the object. As the dog progresses increase the height of the object until the dog can do squats with his front feet on a box his elbow height. For an extra challenge use unstable objects like a balance disc.


Handstands:  
Handstands require a tremendous amount of core strength, both for dog and human. For the human start in push-up position, feet against a wall. Move your hands inward and walk or slide your feet up the wall. Bring your feet up the wall as far as you can. As you progress, try to get your feet high enough up the wall so that your back is straight. Add duration in this position, but always remember to progress slowly!  Once you are comfortable backing into a handstand the next step is to learn how to kick up into a handstand (back to the wall instead of stomach!)


For the dog a handstand is a progression of backing up onto an object. Start small, and gradually teach the dog to back up onto higher and higher objects. Keep in mind that not all dogs are physically capable of doing a handstand, but backing onto a shoulder height box still requires quite a bit of core strength and muscle activation. You can also build strength in the position by having them slowly step forward off of a taller object and stop with front feet on the ground and back feet on the object.


Quadrupedal Movement (QM):
QM is moving with all four limbs on the ground. There are many different variations, the easiest of which is the equivalent of a dog trotting. Your hands and feet should move in diagonal pairs, keeping your legs directly under you and your back as level as possible. This exercise builds both strength and endurance and is much harder than it looks!  


Dogs do QM every day! Since we are moving how they move every day, now they are going to move how WE do every day. This exercise builds both core strength and balance for dogs and can easily be adjusted for skill level. Start by supporting your dog’s front feet either with a wall, your arm or a tall object. Gradually, he should be able to hold his front feet off the ground without assistance. As he improves ask for longer times, more back foot movement, or even squats.


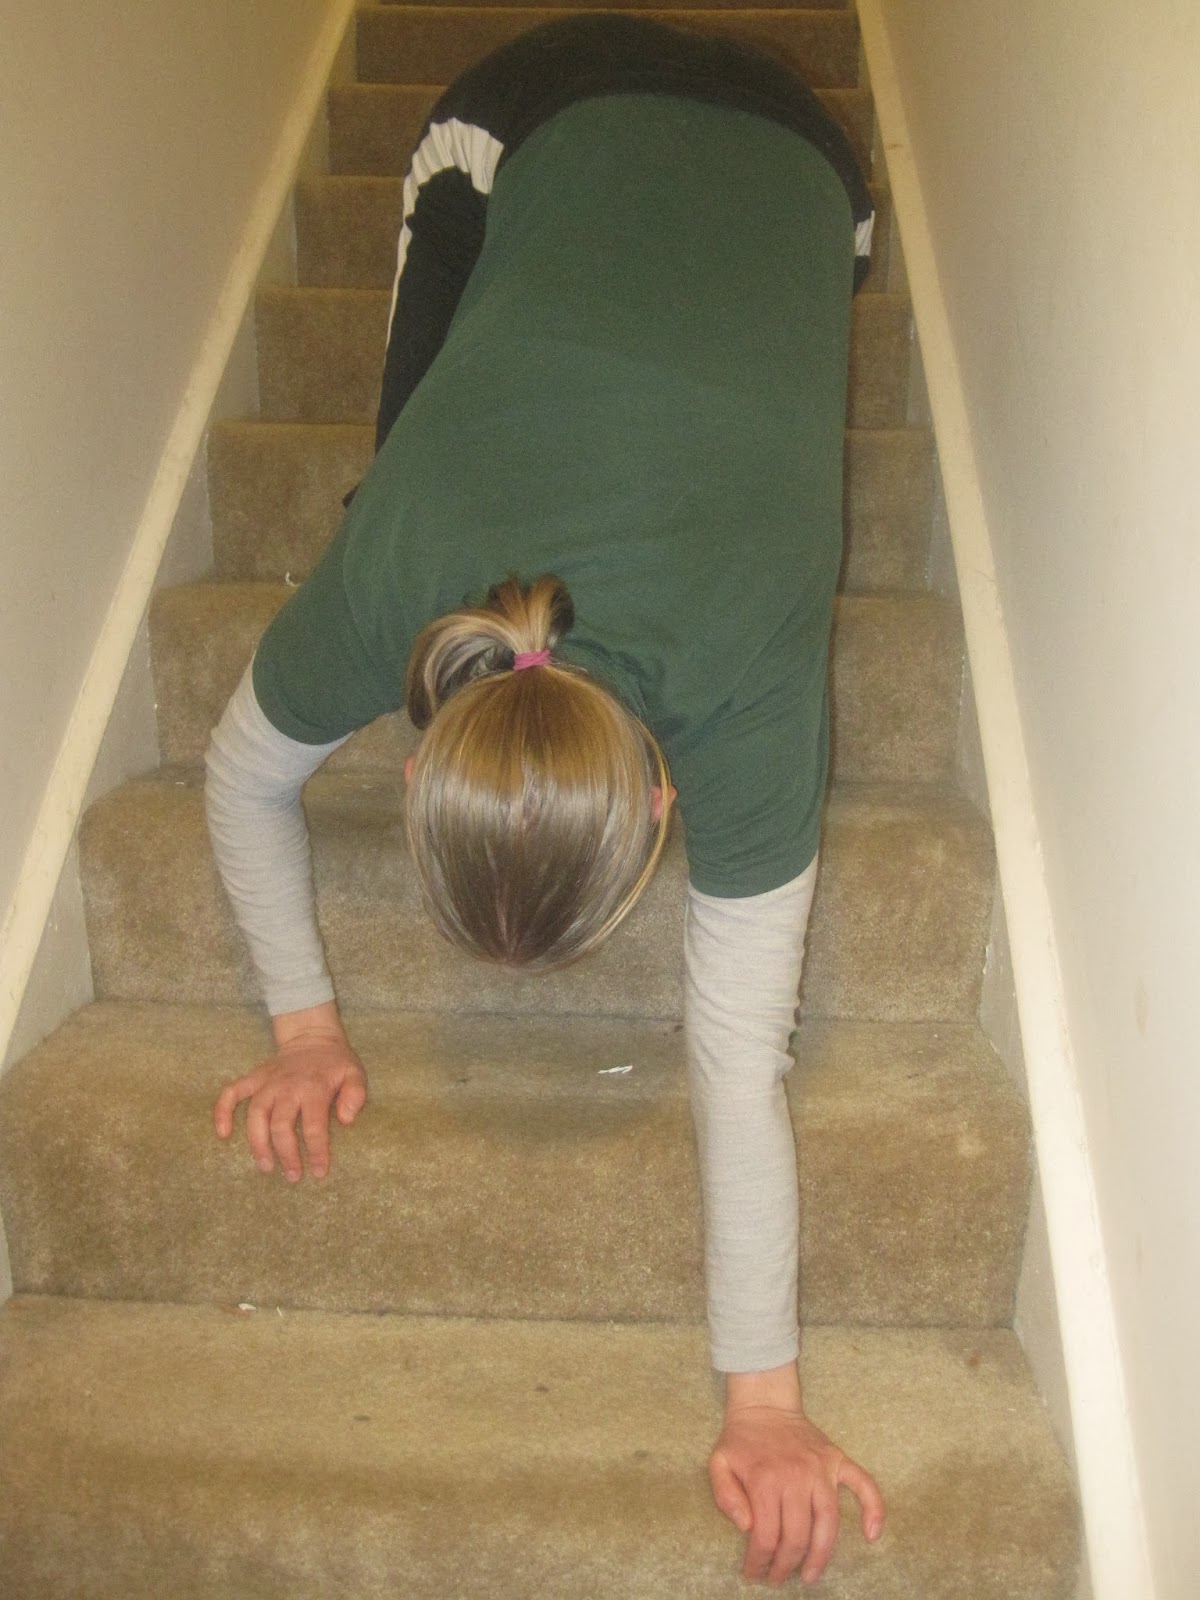
QM Up Stairs:

A very difficult version of QM is to go feet first up a flight of stairs.  This exercise requires power, strength, and endurance. You should start with a short flight of long, low stairs and build up from there.


Even though dogs move on 4 legs every day, they will still get significant benefits from learning how to back up a flight of stairs. Start low, teach the dog to back up (see http://www.youtube.com/watch?v=pUeSGHMGGGY). Progress to backing up on a low step, encouraging the dog to alternate which foot he places on the step first. When the dog is comfortable with one step progress to a staircase. Remember this is hard work! Start with only a few steps and progress to being able to do the whole staircase multiple times.


Traverse:

Traversing simply means moving in a lateral direction. One variation is for your hands to be on the ground, and feet on an object such as a wall (start low!). Move laterally, and make sure to go both directions.


Side Step: Find a low board or wall. Teach the dog to put his rear feet on the board. Either lure or shape sideways movement, start small and pay attention to the back feet.
Move sideways, in both directions. Repeat the same exercise with the front feet on the board instead of the back.


Pushups:
Pushups build upper body strength and core strength. If you are just starting pushups, start with your hands at waist height and feet on the ground. Remember to engage your core and keep your back straight. As you get stronger place your hands on lower objects until you can do push ups on the ground! Pushups can be made harder by doing them with your feet slightly elevated, or with your hands on gymnastics rings. You can experiment with many different variations. Things such as changing elevations, hand placement, and speed can dramatically change which muscles you target.


There are two variations of pushups for dogs. The first one is alternating between sits and downs. Start on the ground, and as they get stronger progress to doing them on a wobbly surface such as a “peanut” or balance pod.
Another variation is starting with rear feet on a elbow height box. Either lure your dog or have him nose target your hand. The goal is to get the dog to stretch and flex his shoulders as he reaches downward. This can also be made harder by replacing the box with something more wobbly. As he progresses you can ask for longer holds in the flexed shoulder position.


Remember, both you and your dog should ENJOY exercise so have fun and be creative, while always remembering to progress slowly and keep safety in mind! If you discover any other great exercises that both you and your dog can do be sure to comment.

Monday, January 20, 2014

Strength and Conditioning Skills: Backing Up


Skill: Backing up

Benefits: Rear end awareness, increased range of motion, rear end strength, balance

Sports applications:  Rally Obedience exercise, rear end control,  increase strength for jumping in agility and flyball, useful in household situations

Safety: Keep in mind this exercise requires a lot of strength. Progress slowly.

How to train it!:
Shape it: Click and treat for any movement backwards. Specifically look at the back feet, watch for the tiniest indication of movement. Be patient!
Lure it: Hold the treat at the dogs nose level very close to his nose. Gradually back the treat towards the nose until the dog moves one foot backwards (this will often be a back foot). Give a treat as soon as the foot moves. Gradually require more feet to move before giving a treat. If your dog sits, it likely means that you have held the treat too high.

Variations: Start with your dog backing up on the ground. Practice  with the dog at both sides as well as with the dog in front of you. When your dog is confident with all of these variations add items to back up onto. Start low, and gradually increase the height of the object. Include both solid objects and objects that move slightly. Possible variations of backing up include:
  • Onto:
    • Mat
    • Books
    • Cardboard boxes
    • Fit discs
    • Steps
    • Laundry baskets
    • Fitness Peanuts
  • Over ladder flat on ground
  • Between cones
  • Around cones

Backing Up Video


Saturday, January 11, 2014

101 Uses of Barriers!

Just kidding, we only have 60 uses for our barriers. We made barriers for our classes over winter break and used them for the first time in class this week! The barriers are made of corrugated plastic cardboard and duct tape, and are extremely versatile. (See www.posidog.org/barriers for instructions on how to make your own.) We first started using them at dog camp last year, and are continually amazed by how many uses they have! Here are the uses we have come up with, do you have any of your own?


  1. Divide the classroom into multiple stations
  2. Manage reactive dogs
  3. Manage reactive handlers!
  4. Provide a visual barrier for reactive dogs
  5. Work on out of sight stays
  6. Take a nap where the campers can’t see you!
  7. Teach recalls with two dogs running side by side at one time
  8. Build A MAZE!
  9. Make heeling patterns
  10. Perfect your out of sight recall
  11. Make bedrooms for campers
  12. Recall with handler hiding
  13. Corral enthusiastic teenagers
  14. Build forts
  15. Make boxes so treiball doesn’t run away
  16. Build part of an obstacle course
  17. Make a spectator area (spectators WANDER)
  18. Corral tennis balls
  19. Safe place for shy/ fearful dog
  20. Keep trainers safe from people aggressive dogs
  21. Make sure people stay where you put them
  22. Observe dogs without interfering with dog/ handler
  23. Cover crates
  24. Make dividers between crates
  25. Keep dogs from extracting nearby items into their crates
  26. Separate dogs with food toys
  27. Allow multiple dogs and handlers to work off leash with less visual stimuli
  28. Teach straight backing up
  29. Make a flyball lane
  30. Teach go around
  31. Blind retrieves
  32. JUMPS (accidently)
  33. Whiteboards you can only KIND of erase
  34. Doors
  35. “Junk pile” hiding (otherwise known as supplies)
  36. Mat behavior
  37. Napping
  38. Rain protection
  39. Frosting fights protection
  40. Dog painting surface
  41. Decorations
  42. Riot Gear (if the rioters were armed with water and frosting)
  43. Sunshade
  44. A very sad stage
  45. Backdrops for pictures
  46. Movie Props
  47. Barricades for launched ammunition (dumbbells, dog treats, cupcakes)
  48. Biggest book ever!
  49. Time out area
  50. Hiding place
  51. Hide and Seek
  52. Doorway block
  53. Ducks in a row
  54. Herding cats
  55. Window Block
  56. Playpen for rats!
  57. Place to put your leash
  58. Coat hanger
  59. Separating crazy playing shelties!(or any breed)
  60. Doggie racetrack!